Thursday, 31 January 2013

Cucumber, Honeydew Melon and Walnut Salad


We enjoyed this salad for lunch today. Since coming back from India, Nick has mostly craved fresh  vegetables and fruit so this salad hit the spot. The soft green colours make it look cool in the heat of the day.
If there had been a plentiful supply of mint in the garden I would have used it on its own, but as it is fast disappearing I made do with a mixture of mint, parsley and basil which actually tasted surprisingly good.

Ingredients:

1 large telegraph cucumber ( unpeeled but cubed)
1/2 honeydew melon (peeled, seeded and cubed)
A handful of roasted walnut pieces
3 tablespoons of olive oil
3 tablespoons of white balsamic vinegar
2 tablespoons of sour cream ( or thick Greek yoghurt)
a mixture of finely chopped mint, basil and parsley

Method:

Put the cucumber, honeydew melon and walnut pieces in a large bowl.
Mix the olive oil, white balsamic and cream
Add the dressing to the salad and season to taste with salt and freshly ground black pepper
Stir most of the herbs through but leave a few to garnish the top of the salad.


Wednesday, 30 January 2013

chocolate and walnut cookies with iced tea


While kids would probably prefer milk chocolate melts/chips in these cookies adults deserve to have them  made with half of a 250 gram bar of Whittaker's Dark Ghana Chocolate which contains 72% cocoa. Whittaker's is a New Zealand family run chocolate business and they make really good chocolate as well as being palm oil free.
These cookies are deeply chocolaty, and crunchy with walnuts, but not to sweet at all. The perfect comfort food to enjoy eating out in the garden in this hot summery weather with a glass of iced tea.
 
I created both of these recipes especially for Nick who came back from India today to the comforts of home and to the best summer weather we have enjoyed for ages. So lovely to sit out on the deck and catch up.
 
Ingredients:
 
100 grams of butter
1/2 cup of brown sugar
1 egg well beaten
1 cup  plus 2 tablespoons of selfrasing flour
1/2 cup of walnuts chopped
1/2 bar of Whittaker's Dark Ghana Chocolate
 
Method:
Break the chocolate into squares and whizz briefly into small pieces.
Cream the butter and sugar until light and fluffy
Beat in the egg, then sift in the flour
Mix in the walnuts and chocolate
Roll into teaspoon sized balls and put well apart on abakign tray lined with baking paper.
Bake in a preheated 180C oven for 12-15 minutes until golden brown
 
The recipe was very slightly adapted fromMadhur Jaffrey's " Cooking for Family and Friends".
This was my entry for this week's Comfort Foods challenge.  Each week we are using /creating a recipe from one of Madhur's cookbooks on a different theme. 
 
Have a look at what other cooks have created at


Easy Iced Tea


I found a really easy recipe for iced tea in Madhur Jaffrey's Cookbook " Food for Family and Frineds"

Madhur  Jaffrey tells us that iced tea which is really an American lemonade was invented on a very hot day in New Orleans at the turn of the century. She feels that " the delicate aroma of the tea is less important than the tang of lemon and the clink of ice cubes in a long glass."so finds perfectly acceptable to use good quality teabags instead of loose tea and it's very convenient.

In my experience there are good tasting teabags and some which taste more like sawdust . I played it safe and did use some very good  Dilmah single origin ( 100 percent Ceylon) teabags which came without tags. And this flavoured  the tea really well.

She heated her sugar syrup but I simply added some castor sugar to boiling water and a really good stir dissolved the sugar crystals.

I really liked her idea of serving some simple syrup separately so everyone who drinks it can have control as to how much sweetness they want to add.

Madhur quartered rather than sliced the lemons which made it easier to squeeze some of the juice into the glasses .

Instead of using a sugar syrup I tried adding some Heilala Vanilla syrup and we loved the vanilla flavour this imparted.

I have also played around with adding fruit flavours by dropping slices of ripe ( but no too ripe) stonefruit ( nectarines or peaches or plums) into the tea at the same time as I added the teabags. This added a light fruity flavour.

There are probably all sorts of differeent flavour combinations, but I would always include some teabags, a sweetener, lemon juice and a sprig of mint.

To make it :

Add 6 teabags ( with their tags snipped off) to 4 cups of water
Leave covered in the fridge overnight ( or for at least 12 hours)

Simple Sugar Syrup:

Pour 1/2 cup of boiling water over 1/2 cup of castor sugar and stir well to dissolve.

To serve:
Put one/two iceblocks in each glass
Pour the iced tea over the top
Add a squeeze of lemon juice
Add a sprig of mint
Decorate with a lemon slice 

Pass the sugar syrup separately so each person can sweeten their tea and add more lemon juice to their own taste.


Monday, 28 January 2013

Home Made Muesli


I always used to make my mother in law's June's recipe which is delicious but wheat germ which was once dirt cheap is now an expensive health food item and had disappeared form the supermarket shelves. As it's a treasured recipe I still make from time to time. She served it with milk and stewed apples which go perfectly with it. Here is her recipe:
 
June’s Muesli
 
Ingredients:
4 cups rolled oats
1 cup wheatgerm
1 cup brown sugar
1 tspn cinnamon
½ tspn mixed spice
¼ tspn salt
½ cup of oil
½ cup of milk
Method
 
Put all ingredients in a baking dish. Stir well with a big spoon. Bake at 150 degrees C for 40-60 minutes. Stir again from time to time.
Chopped peanuts and sunflower seeds can also be added to the mixture, and when it has finished baking a handful of chopped apricots is a nice addition.
 
But lately I have been doing it my way and it's now less sugary and buttery. Making muesli is so relaxing. You can play around and tailor it to your own tastebuds.As long as you have some rolled oats you can add lots of other bits and pieces lying round in the pantry .

Here's my basic recipe

Ingredients:

2 cups of rolled oats
4-6 tablespoons of sunflower seeds/chopped walnuts/chopped almonds
1/4 cup of desiccated coconut
1/2 teaspoon of cinnamon
3 tablespoons of brown sugar
1 tablespoon of runny honey
20 grams of butter/ 2 tablespoons of vegetable oil
1/2 cup of raisins/dried apricots/dried cranberries

Method
Put all ingredients except the dried fruit in a baking dish. Stir well with a big spoon. Bake at 150 degrees C for 40-60 minutes. Stir again from time to time.
When it has finished baking a handful of chopped apricots is a nice addition


Sunday, 27 January 2013

Ponsonby Road Summer Colours

Ponsonby Road is one of my favourite coffee haunts, so many great cafes to choose from. But before ordering  a latte I went window shopping with my camera.


Red Onion Tarte Tatin


Nigel Slater bakes it Delia Smith bakes it and so did my niece Julia in Brussels. When she posted a luscious looking pic of it on Facebook ( see below) I couldn't resist joining the club.She used Delia's recipe which like Nigel's can be found online if you google.
 
As luck would have it at the Takapuna Sunday market my favourite veggie sellers from Pukekohe had the first of the new season's red onions.So with a bag of these fresh out of the earth I rushed home and turned to my 1996 volume no.2 of One Year At Books for Cooks  ( Pryor Publications)
Here I found what I think is the perfect recipe for a red onion tarte tatin ( though Julia and Delia may wish to contest this) The decription says it all:
 
"From Lindsey Bareham's Onions Without Tears" this savory Tarte Tatin of red onions glistening with deep purple caramel, set in burnished pastry, is every bit as tempting as its apple ancestor." 
 
I had to make a few small adjustments. I only had 600 grams of red onions ( 1 1/2 pounds/720 grams were used in the original recipe) My balsamic vinegar is on the inexpensive side so to add sufficient depth of flavour I added two tablespoons instead of one and I added it at the same time as the stock so it would have time to permeate the onions) It was to be vegetarian recipe so vegetable rather than chicken stock it was. I left out the anchovies and olives ( new season's red onions can stand alone)

The cloves of garlic were from our first home grown crop. But as there is only one tiny thyme plant growing I used finely chopped rosemary instead.
 
And no, I didn't rise to the culinary heights of making my own pastry but I bought a packet of puff  from Countdown. As there were less onions I managed to squeeze them into a 20 inch ceramic dish which meant that I didn't have to fiddle around with piecing bits of pastry together, one square ( rounded off at the corners) was just sufficient.
 
I'd have to say Julia's red onion tarte tatin looks more gorgeous than mine with those artfully arranged sprigs of thyme.She confessed to polishing hers off  at one sitting. I made it last for two ( one for lunch and one for an early dinner at 3 pm.
 
Ingredients:
 
600 grams of medium sized red onions peeled and horizontally cut into thirds
60 grams of butter
2 tablespoons of sugar
salt and pepper
1 cup of vegetables stock
2 tablespoons of balsamic vinegar
1 tablespoon of finely chopped rosemary
1 square of puff pastry ( rounded off at the corners to a circle slightly larger than a 20 cm dish)
 
Method:
Heat the oven to 190C
Butter a 20 cm round dish
Melt the butter in a large frying pan and when it sizzles arrange the onions on top in one layer.
Cook for about 5 minutes over moderate heat and then sprinkle them with the sugar, the balsamic vinegar and the stock and let them simmer for about 30 minutes until the onions are soft, and have reached a sticky toffyness. Sprinkle with the finely chopped rosemary.
Arrange the onions in the buttered dish.
Lay the pastry  over it and tuck it in like a baby's blanket.Prick with a fork so steam can escape. This prevents soggy pastry.
 
Bake for 30-50 minutes until the pastry is golden brown. Leave it to cool for 5 minutes before turning it out. Now comes the tricky bit.
 
Run your knife around the edge of the tart . Put a plate over it and turn it upside down so it plops onto the plate ( hopefully in one piece, thank goodness mine did)


Julia's red onion  tarte tatin which was my source of inspiration.


Saturday, 26 January 2013

The Art of Coffee Plunging


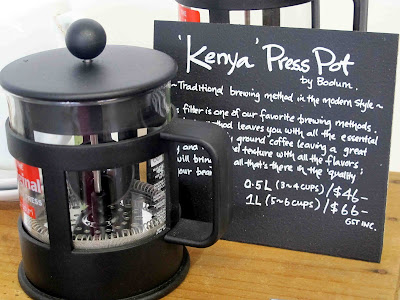
You don't need an expensive coffee maker to make a really good coffee. A plunger ( also called a Press pot) will do just fine if you follow some rules.
 
Over a latte at Columbus Coffee in Albany (run by Danny and Tracey Wrigley) I learnt some of the finer points.   
“One rule is non-negotiable,” said Danny “The beans must be freshly ground."
 “Try this experiment and you’ll see why. Leave some ground coffee out for a few hours. Especially in Auckland’ humid summer weather the moist air will react with the delicate oils in the coffee (which give coffee its distinct aroma and taste) and draws out the flavour.
Smell it after a few hours and you’ll notice how much of the aroma has gone. To get the best result you should use freshly ground coffee within 15-20 minutes.”
Where your beans come from also makes a big difference. A café which is proud of the coffee it serves will be happy to tell you where it was sourced
Coffee beans should always be freshly roasted. After roasting they will start to lose their flavour quite quickly so you should purchase only as many beans as you will use in a short period of time.
If you are storing coffee at home it’s not a good idea to put it in the freezer. The condensation that forms on the beans as they defrost will react with the oils and spoil their flavour. Instead, store them away from the sunlight in an airtight container in your pantry."
I always grind my own coffee beans in a small electric coffee grinder which I have had for ages. It only takes seconds and I love the fresh coffee smell when I open the lid. For a plunger coffee the beans should not be ground too finely as finer grounds are likely to clog the filter.


It’s important to measure carefully. I use one scoop/ 1 rounded tablespoon of ground coffee per coffee mug.
Once the kettle has boiled I leave it to stand for a moment until it is just off the boil. This is important. Too high a temperature can burn your coffee and make it taste bitter. Too low will result in a weak cup.

Just before making the coffee I swirl a little hot water around in it to prewarm it. Then I add the ground coffee.
I pour the water over the coffee and give it a stir to allow the flavours to saturate the liquid. Next the plunger lid is put on and the coffee is left for 4 minutes before plunging gently.If you do it too soon the coffee will be underextracted and this will make it taste weak.

If you make more than you need do not heat it up again later in the microwave , keep it hot in a thermos or freeze it in ice cube trays for your next iced latte.
Unwanted oily residue can taint your next cup so it pays to clean the plunger well after use. My Bodum plunger does not come to any harm in the dishwasher.


 The coffee making equipment shown in the photographs came from the Ark Coffee Company in Takapuna. 


Thursday, 24 January 2013

Vegetarian Zucchini and Corn Slice


This recipe is my vegetarian variation on that golden oldie " zucchini slice" that keep popping up in various cookbooks and recipe sites because it is  quick and tasty and healthy.

Corn is so plentiful and cheap at the moment that it makes perfect sense to add it. I scattered sunflower seeds over the top to add some chewy crunch .The red chili adds a little fire.And for a vegetarian version I left out the chopped bacon

I serve this up with some sweet chilli sauce, a baked potato and a large salad. For a vegetarian it can be a main, but  meateaters can enjoy it as a side and its good to eat at a barbecue. It can be served hot or at room temperature.

Ingredients:

375 grams of courgettes ( about 3 medium sized )
1 large onion
1 red chily ( deseeded and finely sliced)
corn kernels scraped from one corn cob.
1 cup of grated cheese ( I used tasty cheddar)
1 cup of self raising flour
1/4 cup of oil
5 eggs slightly beaten
1/2 cup of sunflower seeds
salt and pepper

Method:

Rinse and microwave the corn cob in its husk for 3 minutes
Scrape the corn kernels from the cob with a knife.
Beat the eggs lightly
Mix all the ingredients except the sunflower seeds together and season
Spoon the mixture into a (16cm-26cm) tin
Scatter the sunflower seeds over the top
Bake in a moderate oven ( 180C-190C) for about 30-40 minutes until golden brown.

Coffee Berry Tea


I've just discovered coffee berries .They makes a refreshing drink which tastes naturally sweet and has a fruity flavour  rather like rosehips or cherries. This tea is reputedly very hich in antioxidants and contains some caffeine.

I brewed it in my little chinese red clay teapot which brought out the flavour. It's ususally made in a plunger and if it is brewed for about 4 minutes will make a dark red tea.

I like it just as it is but you can add some spices like a cinnamon stick, cardamom and/or ginger, much like a cup of chai but without the milk and sugar. On a hot summer's day it can be served icy cold as well

Coffee beans grow inside the coffee berry, but the outside husk has traditionally been discarded or used to make compost. The berries are used to make a drink called Cascara in some coffee drinking countries, or Sultana as it is called in Bolivia.

I found my packet of coffee berries at
http://arkcoffee.co.nz/ in Takapuna.


Wednesday, 23 January 2013

Banana Halva (kelay ka halva)


This recipe was inspired by the Banana Halva recipe in Madhur Jaffrey's Quick and Easy Indian Cooking. I'd tasted Carrot Halva in India and loved this sweet dessert but never Banana Halva. I was intrigued and decided to try it. Unlike Carrot Halva there is no milk in this recipe so it's a good one for vegans too.

In the original recipe 1 tablespoon of chopped unsalted peeled pistachios and 1/2 tablespoon of chopped walnuts were used. Neither of these were in my pantry but I did have sliced almonds and used a small handful of these. Instead of 2 tablespoons of sugar  to sweeten I added a splash of Heilala Vanilla syrup. A sprinkle of cinamon at the end looked pretty and added some spice.

The bananas for this recipe shoudd be very ripe. I think I should have waited for one more day before I made this dessert as my bananas had not quite reached this stage so the dessert was not as  toffee like or darkened as much as it would otherwise have.

I used ghee rather than oil and this worked well but I still had to keep stirring the bananas and watch them like a hawk to prevent them from sticking and burning.

This dessert is quite filling and dense so I served it on individual tasting spoons accompanied by a bowl of whipped cream.

I usually use up my overripe bananas in a banana cake. But as this made a nice and not to sweet dessert I'd make Banana Halva again. I wouldn't leave out the nuts as I think this recipe needs some crunch, or some vanilla  but I may try it with the pistachio and walnut combination which was in the original recipe.

Ingredients:

4 very ripe bananas ( I used All Good Fair Trade)
1 tablespoon of oil/ghee
1 splash of Heilala Vanilla Syrup ( or 2 tablespoons of sugar and a few drops of vanilla essence)
a small handful of sliced almonds
A little ground cinnamon

Method:

Peel the bananas and mash them
In a non stick frypan put the oil/ghee
When hot add the bananas.
Keep stirring as you fry them for 5-6 minutes.
Reduce the heat to medium and fry for 10 or so more minutes until the bananas turn into a kind of soft toffee.
Turn the heat to low and add a splash of Heilala Vanilla Syrup and a small handful of flaked almonds
If you use sugar stir for another 30 seconds until it has dissolved
Let the halva cool to room temperature and cover with cling film until serving time.
Serve with a bowl of whipped cream.

I created this recipe for this week's I Heart Cooking Club Challenge which was focussed on Madhur Jaffrey's Sweet Endings.. Take a look to see what kind of interesting recipes others have contibuted at
http://iheartcookingclubs.blogspot.co.nz/


IHeartCookingClubsMadhurJaffrey


Monday, 21 January 2013

The Ark Coffee Company

 
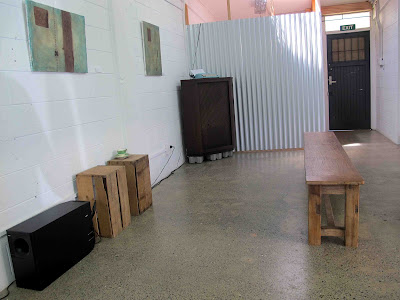
I sat down this morning on a wooden bench  surrounded by lovely artworks and drank the best iced latte I have ever had. Gentle music played in the background. Soon I no longer felt hot and frazzled but serene and relaxed.

If you love coffee and art you would love the Ark Coffee Company which sisters Ulala and Naomi Nakama have recently opened in Takapuna. Here they sell speciality coffees ( which are roasted on the premises). In an adjoining small gallery hang  multimedia paintings by fine arts graduate Naomi.

Ulala  worked in Japan in the coffee industry  for eight years as a roast master before starting the ARK Coffee Company. In Japan coffee culture is different to ours. Coffee is mainly enjoyed at home.There are also many coffee shops. But unlike in New Zealand cafes where the focus is on both coffee and food, in Japan people enjoy a coffee on its own ( sometimes with a small snack).

This has influenced how the ARK Coffee Company has been set up. It is a place to buy freshly roasted speciality coffees ,or a take-away coffee . There is also an impressive range of coffee making equipment for those who like to brew a perfect cup of coffee at home. And you can sit down in the small gallery and sip your coffee there.

You can find the ARK Coffee Company at Shop 6, 461 Lake Road .
or visit their website at http://arkcoffee.co.nz
\